
Hi there!
How about embarking on a project that combines the fun of felt appliqué with the artistry of hand embroidery?
We've got an awesome design featuring the quote "A best friend is someone who loves you when you forget to love yourself.

If you're someone who loves crafts but doesn't have a ton of time for complex embroidery projects, don't worry!
Today, I'm super excited to present a fun endeavor that combines the simplicity of basic embroidery stitches with the delightful art of felt appliqué.
It's a fantastic way to bring your creative vision to life without feeling overwhelmed. So, let's dive into this creative journey together and experience the joy and fulfillment it brings.
Start by downloading the pattern provided and print it out in your desired size.
You can access the PDF printable for the pattern by clicking on the following link:

Once you have the pattern ready, we can move on to the next steps.
In our design, there are certain areas, like the child's jacket and the dog's body, that would typically require intricate embroidery stitches to fill. But guess what?
We're simplifying things with felt appliqué!
We'll cut out shapes from felt fabric and attach them to the design using embroidery stitches. It's a fantastic way to add texture and depth to the artwork without the complexity of fill stitches.
By incorporating felt appliqué, we're able to overcome the challenge of filling those areas and create a visually appealing piece.
So, let's jump into the project and explore how to effectively use felt appliqué to bring our design to life.
Start by carefully cutting out the pattern pieces. Pay attention to the lines and make clean and precise cuts to ensure accuracy.

Next, place the pattern pieces onto your chosen felt sheet and trace around them directly onto the felt using a yellow or white color pencil. This will serve as a guide for cutting out the felt shapes

Once you've traced the shapes, carefully cut them out from the felt sheet, making sure to cut just inside the lines you traced. This will ensure that the felt pieces fit perfectly onto your project.

This will provide a stable surface to work on. Make sure the fabric is taut and securely fixed in the hoop before moving on to the next steps.
We're ready to unleash our creativity with felt appliqué and hand embroidery!
.jpg "Felt applique and hand embroidery - Free Pattern & Tutorial")
To attach the felt pieces to the fabric base, let's begin with the dog's body. Thread a needle with matching thread or embroidery floss and use the whip stitch technique. Stitch along the edge of the felt piece, catching both the felt and fabric with small whip stitches.

Before sewing the felt piece that serves as the body of the dog in its final position, let's give it a cozy touch by lightly stuffing it. Once you're satisfied with the stuffing, sew the opening closed using the whip stitch.
This stitching method creates a secure and seamless finish, ensuring that your felt applique stays intact.

After completing the stuffing, it's time to add details to the dog's ear and body curves.
Create straight stitches along the designated lines to define the bottom part of the ear and add depth to the body contours.
This step will bring out the subtle features of the design and give your felt appliqué a more lifelike appearance.
Don't be afraid to experiment and let your creativity shine!

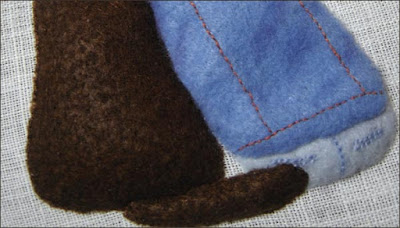
Now, let's move on to the child's denim jacket. Since the felt is a single color, I used a blue colored pencil to add shading and create the illusion of fabric folds.
With the blue colored pencil, I gently applied strokes on the felt, carefully mimicking the look of denim fabric and adding depth to the jacket.
This simple technique allows for easy customization and brings the denim jacket to life with realistic texture and shading.

To give your project an authentic touch resembling a real denim jacket, let's add those distinctive contrast topstitching details. Use the backstitch technique with orange yarn or thread to create the stitching. This will beautifully stand out against the fabric and give your denim jacket that extra pop!

.jpg "Felt applique and hand embroidery - Free Pattern & Tutorial")

Stitch it onto the dog's body where the pieces overlap, ensuring a secure attachment. Leave a small opening for stuffing the interior of the jacket, using a stick to help with filling the sleeves. Once the desired level of stuffing is achieved, carefully close the opening with whip stitches to complete the project.
.jpg "Felt applique and hand embroidery - Free Pattern & Tutorial")
This will give a realistic touch and enhance the overall appearance of the pants. Take your time and enjoy this step of the process.

Follow the same process as before, using whip stitches to attach it to the fabric base.
Refer to the provided photos to guide you through the process and ensure accurate placement of the felt piece.
By following the visual cues from the reference images, you'll be able to seamlessly integrate the pants into the overall design.
.jpg "Felt applique and hand embroidery - Free Pattern & Tutorial")


To create a textured appearance resembling hair, start by filling the flesh-colored felt piece with long, straight stitches.
.jpg "Felt applique and hand embroidery - Free Pattern & Tutorial")
Let's add the felt piece representing the dog's tail to both the fabric base and the child's pants. Use whip stitches to attach the tail securely to both surfaces.

After attaching the dog's tail to both the fabric base and the child's pants, it's time to stuff it lightly to give it a three-dimensional appearance.
Carefully fill the tail with a small amount of stuffing, using a thin stick or tool to help distribute the filling evenly.


Overlap the stitches as you work your way up, gradually building the hairline.
Experiment with stitching at different angles to achieve a realistic hair effect. Avoid pulling the stitches too tightly, as this will give the head a rounder shape and add volume.
Take your time during this step and enjoy the process of shaping the head, ensuring a natural and lifelike look.


 Next, I take a ballpoint pen that has run out of ink, which is important to prevent any accidental ink marks on the fabric in case the paper tears. I press firmly over each letter, going over all the lines.


You may also like


After filling the felt piece for the head with stitches, it's time to attach it to its designated position on our design. As before, stitch around the edges of the felt piece, ensuring it is securely in place.
Don't forget to lightly stuff the inside for added volume.
Finally, using the same thread we used for the hair, create longer and looser stitches on top of the head. These stitches will further enhance the realistic look of the hair.
Let's stitch a vibrant and colorful meadow filled with wildflowers using simple embroidery techniques. We will create a cheerful and bright scene where our characters can sit and enjoy the beauty of the blooming flowers in the fields.
First, using brown embroidery floss and the whipped back stitch technique, stitch long, vertical lines in a sloping pattern to represent the ground they are sitting on. Adjust the length and spacing of the stitches as desired.
Afterwards, start stitching the grass. Use green embroidery floss to create long, upright stitches that resemble blades of grass. Vary the length and direction of the stitches to add depth and create a realistic look for the meadow.


"Let's stitch some delightful daisies! Use the cast-on stitch to shape the petals, arranging them in a joyful circular pattern. Bring those petals together at the center and watch as beautiful daisies bloom before your eyes.
Now, let's turn our attention to the charming red poppies. With the cast-on stitch, sculpt those petals into vibrant flowers that exude happiness and warmth.
But we're not done yet! Let's add some lively stems to our floral friends using the whipped back stitch.
***
Now it's time to embroider the heartfelt words that are the essence of our design: 'A best friend is someone who loves you when you forget to love yourself.'
When I started creating the design, I worked spontaneously, so the words haven't been transferred to my fabric yet. However, I've included a printable pattern among the PDF files I prepared for you.
As I continue on my own journey, I'll transfer the text now. In the meantime, I'll also show you a pattern transfer method that will come in handy for your future projects. Let's get started!"
I transferred the design of the text onto tracing paper. If you can't find tracing paper, you can use baking paper as a substitute. Baking paper, which is commonly found in kitchens, works well for transferring the design.

"I flip the tracing paper over and trace over the lines on the reverse side using a soft pencil. I make sure to go over each letter clearly and firmly.

After finishing the tracing, I secure the paper with the traced text onto the fabric using pins.
I make sure that the front side of the text is facing towards me, just as shown in the picture.
The part we wrote in reverse using a pencil is now facing the fabric.


When I lift the paper from the edge, I can see that the letters have transferred nicely onto the fabric, as depicted in the picture.

After transferring all the letters, I remove the pins from the paper and lift it off. At this point, I notice that the pencil marks on the fabric appear relatively faint.

To enhance the visibility of the letters, I go over them once more using a soft pencil.
This additional step ensures that the pencil marks are completely erased and the letters become more pronounced on the fabric.

Embroider the letters with black embroidery floss, using stem stitch.
Stem stitch is an embroidery technique that creates a twisted rope effect and it is great for handwriting font.

Now, let's move on to embroidering the text. Use black embroidery thread and employ the stem stitch technique to stitch the letters. The stem stitch creates a twisted thread effect and is perfect for achieving a handwritten font.


Doesn't it look wonderful? It can serve as an excellent gift idea, carrying a deep and heartfelt meaning. Moreover, decorating your room with it would add a personal touch to your space.
If this embroidery project has managed to inspire you, it would bring me great joy.
That's all for now.
Want more project ideas like this? I've got another one in mind! Check out the link below to explore it: Teddy Bear with Felt Applique and Crochet Roses: A Thoughtful Gift Idea
Hope you find it inspiring!"
 |
You may also like


.jpg)


