Hello there!
In today's tutorial, I'm excited to share an exciting project with you that will elevate our 3D embroidery skills.
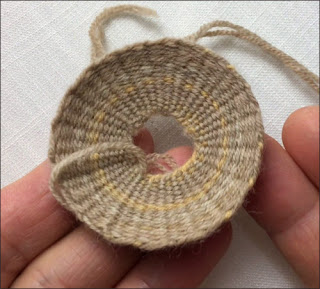
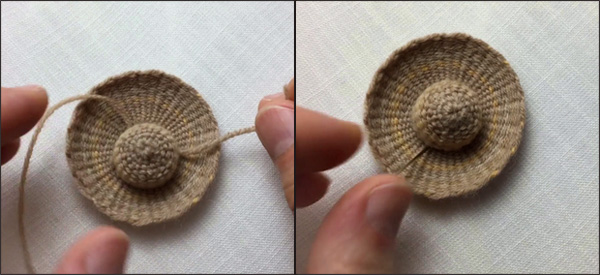
Together, we'll craft a wide-brimmed straw hat, adding a unique flair to your human figure designs.
With the needle weaving technique, I'll guide you through shaping the hat's crown and edges, resulting in an impressive 3D effect.
A 3D embroidery adventure ignited by a comment on one of my YouTube videos.
I was dealing with the electrical connections of the lights in my simple set, where I film embroidery tutorial videos, and during this time, I had temporarily paused my stitching activities.
A sweet viewer had asked me with such heartfelt words if I could create a 3D hat embroidery. I couldn't refuse. I picked up my needle and thread once again and started experimenting to see what I could create.
Of course, the most effective way to give a straw hat shape was through the needle weaving technique. Finally, in this limited time, I managed to bring forth a hat.
However, due to the time constraints, I didn't have the chance to embroider a girl wearing the hat, so I settled for adding heart motifs around the hat design.

As for how to incorporate this hat into your own embroidery projects, I leave that creative endeavor to you. And for those eager to learn how to bring this hat to life, I'm transitioning to an instructional phase.
Opting for a more practical approach, I decided to create the hat in two distinct segments. I chose to weave the upper portion of the hat 'crown of the hat' and the wide edges 'brim' as separate components.
I had jumped into the project so quickly that when I revisited the instructional video, I realized how hilariously amateur my template was. But now, I've managed to mend my ways and create a fitting template.
*You're viewing the pattern indicating the locations to mark on the fabric as a small image, but it's actually in a larger size. Therefore, if you double-click on the image and click on the magnifying glass icon in the opened window, you can obtain a clearer picture.
I begin with the "crown of the hat" part.
I carefully stretch my fabric onto a small embroidery hoop and mark the points where I'll be making basting stitches using my template.
As seen in the image, I carefully position 20 straight stitches that are evenly spaced and vertically aligned across the circle, creating a circular shape.
I chose a strong thread for the straight stitches. Despite starting with a secure knot, I added a few reinforcement stitches at the same point on the fabric. This was to ensure that the warp threads wouldn't come loose as I attached them to these stitches, preventing any unexpected unraveling. I repeated this reinforcement when finishing the stitch, so keep this in mind.
While working on my project, I used a light brown wool thread that I found suitable for the straw hat. In fact, the thread has a subtle transition to a yellowish hue at times, which I believe adds a pleasant texture to the work.
You can easily replicate the same effect using embroidery floss. However, if you have knitting yarn in a suitable color, don't hesitate to give it a try.
I tie a big knot at the end of my working thread and leave the knot on the fabric. Then, I bring my needle to the back side. Afterward, I promptly bring the needle to the front side of the fabric from the point between the 1st and 20th stitches.
I take a small Styrofoam ball with a diameter of 1-1.5 cm and then gently compress it from both sides, using my fingers to create a slightly flattened circular shape.
I create a hole in the center of the foam ball that is large enough for the needle and thread to pass through.
I thread my needle with a 15 cm green thread, tying a large knot at the end.
I bring my needle from the back of the fabric to the front. Leaving the knot on the back side, I pull the thread all the way through.
Afterward, I pass my needle through the center of the foam ball and pull the thread through to the end. The green thread serves as an anchor, helping me position the foam ball at the center of the circle formed by the warp stitches.
Now, I'm beginning to create my warp threads. I thread my needle with the brown-colored thread and start working.
As shown in the illustration, the foam ball is positioned against the fabric, with the green thread emerging from it held between the fingers of my left hand.
While maintaining this grip, I skillfully loop the brown thread, threaded through my working needle, around the green thread using my right hand. Subsequently, I carefully guide my needle underneath the 20th and 19th stitches on the fabric, smoothly pulling the thread through until reaching its end.
Now, I've created two warp threads – one anchored at the top by the green thread emerging from the center of the foam ball and the other ends secured by the stitches on the fabric.
I repeat these steps until I've completed all the stitches, as you can see, resulting in a total of 21 warp threads.
As seen in the image below, I take my 21st and final warp thread, wrapping it around the green thread on top of the foam ball from the opposite direction.
Afterward, I initiate the weaving process. I thread my needle under the 1st warp thread located to the right of the 21st thread, then pass it over the 21st thread and under the 20th thread, pulling the thread through to its end.
While continuing to hold the green thread with my left hand, ensuring it passes through all the warp threads, I execute a single row of weaving, alternating between passing under one warp thread and over the next.
I then firmly pull the working thread to ensure that the warp threads are neatly arranged in the center.
Now that I no longer need the green thread, as shown in the image below, I pull the large knot left behind on the back of the fabric to remove the thread from the fabric.
*At this point, you might be wondering why we didn't just use a pin to secure the thread on top of the foam ball instead of dealing with the green thread. Well, using a pin with its stiff metal would have caused the warp threads to overlap, resulting in an unwanted accumulation of threads and a bulge at the center.
From this point onward, it's smooth sailing. To facilitate the circular weaving, I gently rotate the hoop in the palm of my left hand while continuing to weave with the needle in my right hand. I continue like this until I reach the bottom of the weave.
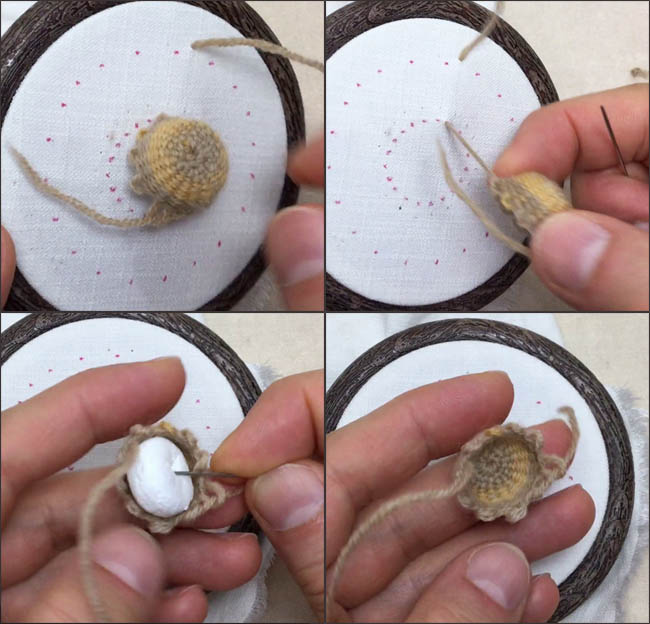
As you can see in the image, the weaving is complete, and it's time to remove everything that attaches the woven piece to the fabric.

I start by cutting the knot I initially left on top of the fabric, and then I carefully remove the straight stitches from the fabric.
Now that there's nothing holding the woven piece to the fabric, I grab an end and gently pull it up. I can finally take it into my hand.
Using the tip of my needle, I catch the foam ball inside and carefully remove it.
There you have it, the crown of the hat is complete!
Now, I'm moving on to weaving the wide edges, the 'brim' part.
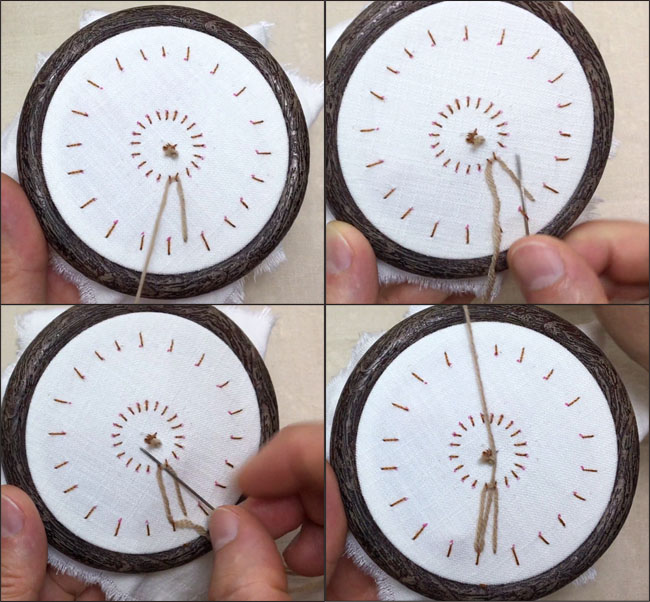
I've cleared the fabric from the threads of the previous weave. Now, for my new weave, I'm utilizing the points drawn on the fabric differently to create the warp stitches, as shown in the picture.
I move on to the second piece, using the same brown thread. After threading the needle, I tie a secure knot at the end of the thread. Leaving this knot on the fabric's surface at the center of the circle, I then guide the needle to the back of the fabric.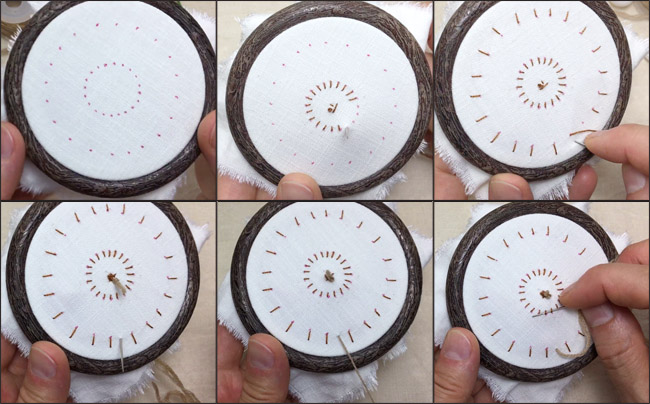
As seen in the picture, I have two rings made up of vertical and straight stitches placed side by side. One is the narrow circle at the center, and the other is the wider circle on the outside. I will attach my warp threads to the stitches that make up these two circles to create the pattern.
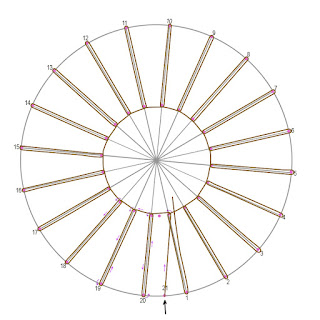
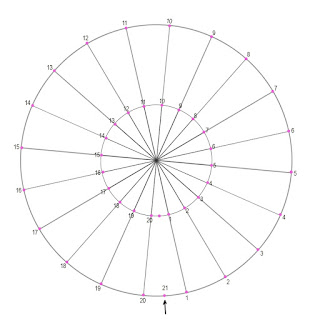
*At the beginning of the tutorial, I added my regular pattern, and now I want to include the template that illustrates the progression of warp threads. If you examine it closely, I believe it will make your work easier.
I bring my needle up through the fabric from the back to the front, between the 20th and 1st points (21st point), and then I pull the thread through until the end.
I pass my needle under the 1.th and 20.th stitches of the inner circle, pulling the thread through to the end. Then, I move towards the outer circle, guiding my needle under the 20th stitch and pulling the thread.
As depicted in the image above, I guide my needle beneath the warp thread situated between the 1th and 20th stitches of the inner circle, smoothly pulling the thread through until it reaches its end.
Continuing on my journey, I pass my needle under the 20th and 19th stitches of the inner circle and pull the thread through.
I make sure not to leave the warp threads too loose, constantly checking the tension. Then, I move towards the 19th stitch of the outer circle and pass my needle under it, pulling the thread through.
I continue like this until all the stitches are completed, creating a total of 21 warp threads.
If you follow the pictures, you'll understand better.
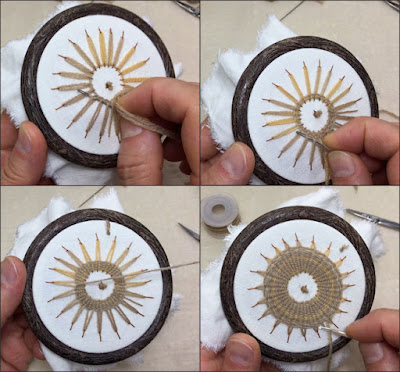
I've completed the warp threads, and I begin weaving. Along the circular shape, I continue to weave by passing my needle under one warp thread and then over the other.
For a weaving project of this scale, it's quite likely that the thread you've threaded into your needle will run out well before you're halfway through your weaving.
When I finish the weaving, I proceed to cut the stitches and knots that attach the woven piece to the fabric. Afterward, I gently remove it from the fabric.
Finally, we've reached the end of this tutorial. I hope you found it helpful and inspiring.
Now, it's your turn to get creative and start weaving your own hats. Keep experimenting and honing your skills in the world of weaving. Until next time, happy weaving.😊


.jpg)


.jpg)
.jpg)
.jpg)
.jpg)
.jpg)
