Needle weaving in embroidery is an exceptionally approachable technique, enabling the versatile enhancement of different textures, patterns, and shades within embroidery projects. The crux of this method involves forming a "warp" using vertical straight stitches, followed by weaving horizontal "weft" threads through these vertical stitches.
The three-dimensional application of this technique includes stitches like woven bar stitch and woven picot stitch, which create dimensional petals and leaves.
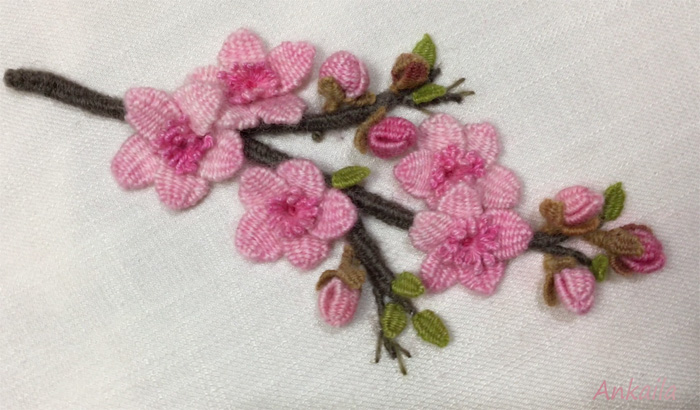
Today, I'm thrilled to introduce you to a unique project that revolves around the fascinating world of needle weaving techniques. Central to this endeavor is a design that beautifully captures the essence of spring – a 3D cherry blossom branch. What truly distinguishes this project is the meticulous use of needle weaving in crafting almost every element.
I'm genuinely excited to take you on this journey, guiding you through the process and unveiling how needle weaving has the power to infuse enchantment into embroidery, all while bringing the vibrant spirit of spring to life.
We'll start by delving into my chain picot method, the very technique that breathes life into the delicate spring blossoms, as we embark on this instructive adventure together.
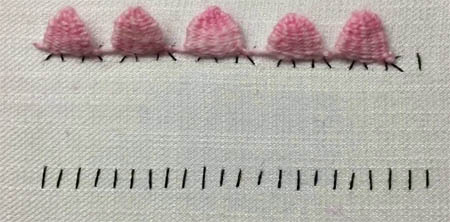
I've previously demonstrated the various applications of my chain picot technique, such as the version involving securing the warp threads with small safety pins. In today's project, I experimented with a different approach by using basting stitches on the fabric to anchor my warp threads instead of safety pins.
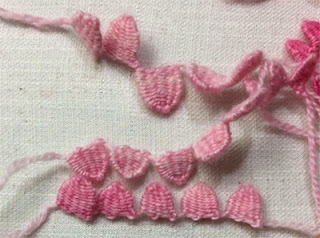
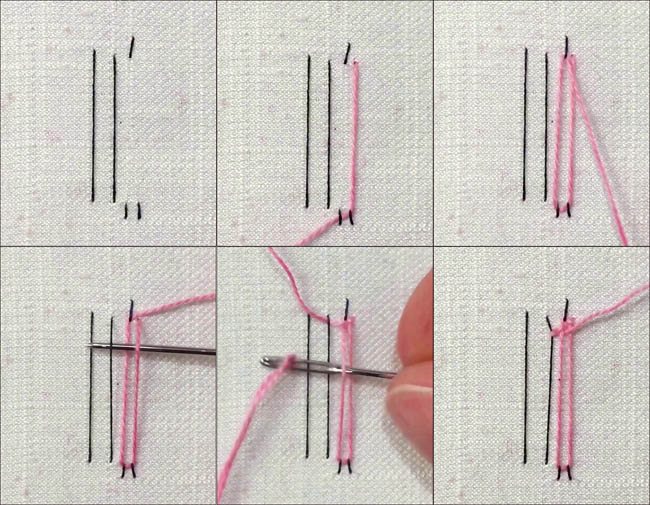
You can see how I create my warp threads in the image above.This time, I'm taking my chain picot technique a step further. I'm crafting picots, each comprising of 5 warp threads. By now, you're familiar with how I create the chain picot, aren't you? Once I finish weaving, there will be 5 picots at the base, with their ends interlocking each other.
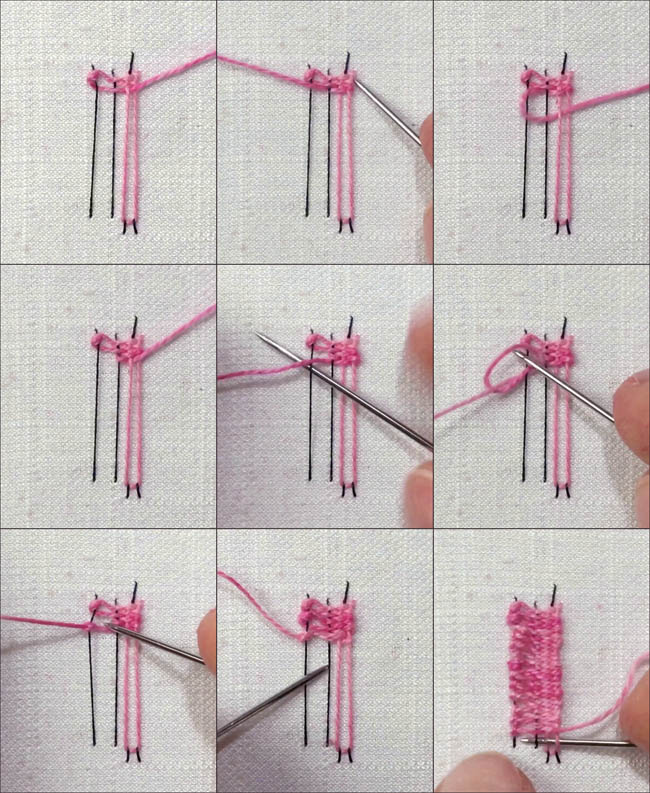
I create a loop around the bottommost part of the last warp thread of the picot. Afterward, I pass the needle through the loop and tighten it to secure. The image above beautifully illustrates the process of forming the second picot. I continued to create the subsequent picots using the same steps.
I've completed my woven chain picot and now I'm proceeding to remove the basting stitches that secure the picot to the fabric.
I've reached the most enchanting moment of my technique.
After undoing the basting stitches that attach my picot chain to the fabric, I'm left with tiny loops along the base of the picot chain.
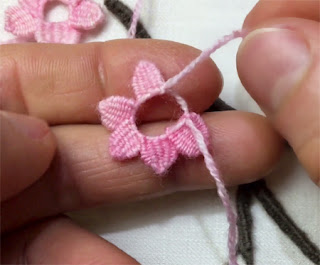
Taking the thread dangling from one end of the picot, I thread it through my needle. Starting from the other end of the picot, I thread these loops along the base onto my needle one by one. Passing my needle through their centers, I gently pull the thread. As I tighten the thread along the base of the chain picot, the picots converge at the center and gracefully form petals.
My chain picot transforms into delicate flower petals, completing the transformation.
I affix the meticulously crafted flowers onto my embroidery design precisely where I intend them to bloom.
The remaining threads from weaving are still attached to the flowers; I haven't cut them off yet. By threading these leftover tails onto my needle, I can easily sew the flowers onto the fabric without needing additional thread.
This technique involves anchoring the threads to the basting stitches. During the weaving process, the threads are supported by these basting stitches, ensuring that the shape remains undistorted and the weaving stays smooth.
To initiate, I begin by crafting basting stitches using a durable thread, as evidenced in the images.
The weaving process will result in a fringed needle weaving bar stitch. If you're following the progression of the weaving through images, you'll notice that at the tips of the fringes, I create two knots that overlap, as I continue with the weaving.
After each row of fringes, I weave two rows of straight bars, and then I proceed to create another fringe, continuing with the weaving process.
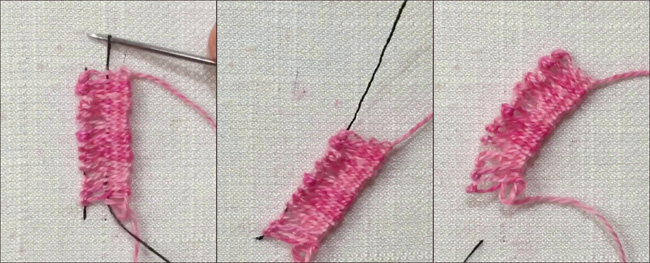
After finishing the entire weaving process, I delicately remove the basting threads and separate the woven piece from the fabric.I secure the fringed needle weaving bar stitch between my left thumb and index finger. With my right hand, There are two tails hanging from each end of my weaving stick.
I choose one of these leftover threads from the weaving. This tail is the part that extends between the weaving area and the knot I left at a distant point on the upper section of the fabric when I started weaving.
Slowly, I start pulling the tail, causing the weaving to transform from a straight line to a circular shape.
I thread a blunt-ended needle onto the free end of the tail . I pass the needle through the first 4-5 loops at the other end of the weaving, and then I pull the thread tightly to create a smooth circular shape. And there you have it, my pollen comes to life.!
Now, I'm placing it at the center of my flowers and carefully stitching it in place. My flowers have truly come alive.
I'm sure you couldn't have missed the dimensional branches in my embroidery project. I'd like to briefly demonstrate a technique I used to create these branches with a needle weaving cylinder shape.
Leaving a thread tail of about 10-15 cm on the back of the fabric, I bring the needle and thread to the front of the fabric, I ensure that the tail hangs freely on the back side of the fabric.
Leaving a straight stitch of about 4-5 mm on the front side of the fabric, I guide the needle and thread to the back of the fabric. I remove the thread from the needle, letting the tail of that thread hang freely on the back side of the fabric.
I thread a new strand onto my needle, making sure it's about 50-60 cm long this time.
I bring the needle up through the fabric, aligning it as if to make a 2-millimeter vertical stitch that intersects the center of the 4-millimeter-long starting stitch.
Using a blunt-tip needle, I pass it beneath the initial stitch and pull the thread through, all while retaining the 10-centimeter-long tail below, of course.
Afterward, I immediately pass my needle under the 2-millimeter stitch.
When I gently lift the woven part, I can observe three warp threads emerging from the fabric in a circular arrangement at equal intervals, moving upwards from the back of the fabric. Now, I no longer need to focus on the stitches themselves. I simply continue the cylindrical weaving process by going under one of the threads and over the next, spiraling around as I go.
As I progress, I periodically lift the woven section slightly, creating a space for the needle to pass through between the warp threads. However, I make sure to hold onto the tails on the back of the fabric with one hand.
I've crafted chain picots featuring three petite picot stitches each, designed for the flower buds. If you're interested in observing how I create them, I've provided a clickable link that will directly lead you to that specific segment of the tutorial video on my YouTube channel.
In the images above, you can observe the gradual elevation of my cylindrical weaving.
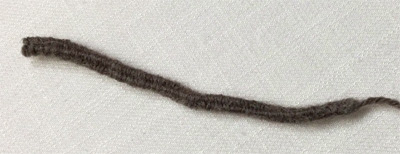
When my woven piece reaches the desired length, I grasp the end and pull it out from the fabric.
And there you have it – my woven branches are now in the palm of my hand.
I think I can name these as "Needle Weaving Cords," right ? :)
What do you think, is this method worth trying?
I've showcased this technique, and now I'm eager to see how you might apply it in your own creations. It opens up possibilities for various creative uses.
For instance, in one of my other embroidery projects, I employed the same method to craft three-dimensional letters.
Absolutely, it's been quite an in-depth tutorial. It could be a good moment to bring it to a close.
I've poured a lot of dedication into this embroidery project, and if the techniques I've shared end up being advantageous for your own pursuits, it would be a rewarding result for me.
I hope that I have been able to inspire your creativity and that you found the time spent here to be valuable.💟

