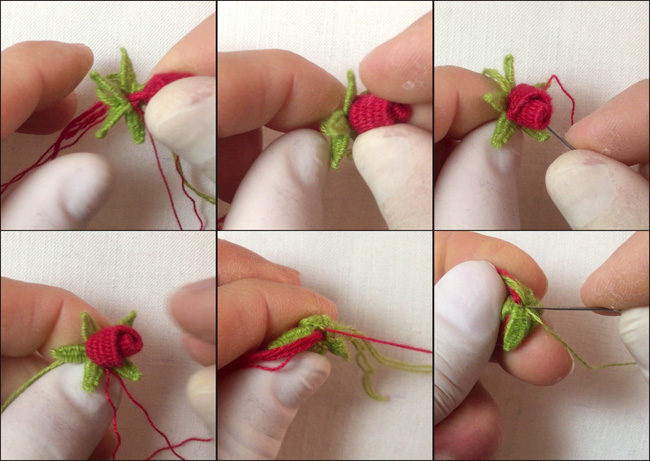
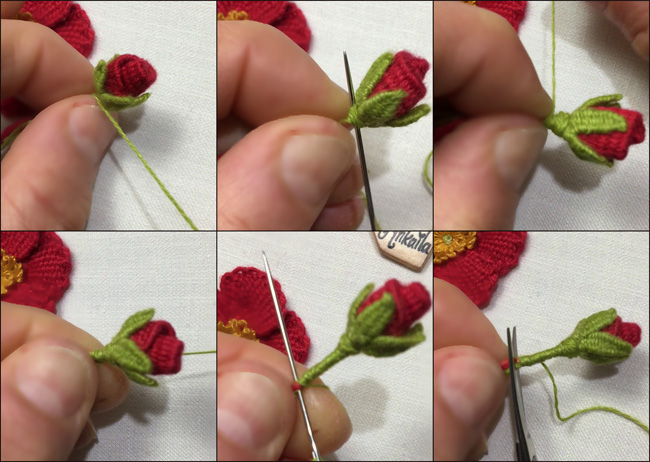
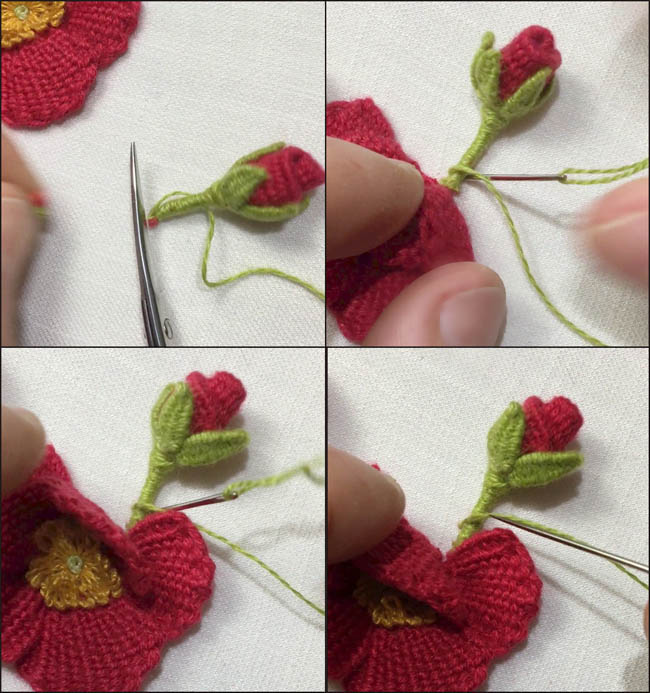
Creating 3D Rosebuds with Standalone and Chain Woven Picot Stitch Techniques


 Today, I'm here to introduce a new idea that will add depth to your 3D embroidery work.
 I'll be demonstrating how to create three-dimensional rosebuds using the Standalone Woven Picot and Chain Woven Picot Stitch techniques. 
Today, I'm here to introduce a new idea that will add depth to your 3D embroidery work.  I'll be demonstrating how to create three-dimensional rosebuds using the Standalone Woven Picot and Chain Woven Picot Stitch techniques.

I'm beginning my work by using the 'Standalone Woven Picot Stitch' technique to create a long picot. You should know that this technique allows me to form a free-standing woven petal. I aim to create a long picot measuring approximately 2 centimeters in length and 6-7 millimeters in width.

First, I stretched my working fabric onto the hoop.

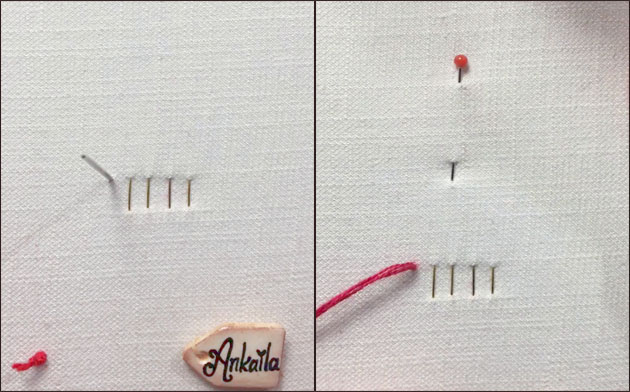
I'm vertically placing four safety pins on the backside of the fabric, evenly spaced as shown in the picture, by passing them through the fabric and closing their clasps, leaving approximately 2-3 mm of space between each.
 I'm threading my working needle with red thread and tying a knot at the end. Leaving the knot on the top side of the fabric, outside of my working area, I pass my needle through from this point and bring it down to the backside of the fabric.

Today, I'm here to introduce a new idea that will add depth to your 3D embroidery work.  I'll be demonstrating how to create three-dimensional rosebuds using the Standalone Woven Picot and Chain Woven Picot Stitch techniques.
I bring my needle to the front of the fabric from a point approximately 2-3 mm to the left of the first safety pin on the fabric. Then, I pull the thread all the way through.I'm placing a pin in the fabric to serve as an anchor for my picot. 

Today, I'm here to introduce a new idea that will add depth to your 3D embroidery work.  I'll be demonstrating how to create three-dimensional rosebuds using the Standalone Woven Picot and Chain Woven Picot Stitch techniques.
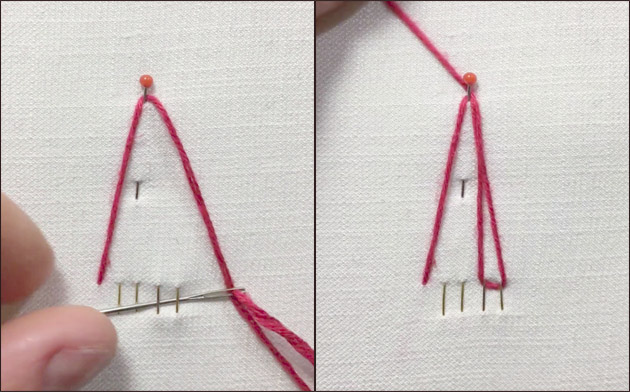
I secure the thread by passing it behind the large head of the safety pin. Then, I approach from the right side with my needle, passing it under the 4th and 3rd safety pin wires. I pull the thread all the way through. 
I secure the thread once again by passing it behind the head of the pin. Then, I guide my needle from the left side, passing it under the 1st and 2nd wires. I pull the thread all the way through.
Today, I'm here to introduce a new idea that will add depth to your 3D embroidery work.  I'll be demonstrating how to create three-dimensional rosebuds using the Standalone Woven Picot and Chain Woven Picot Stitch techniques.
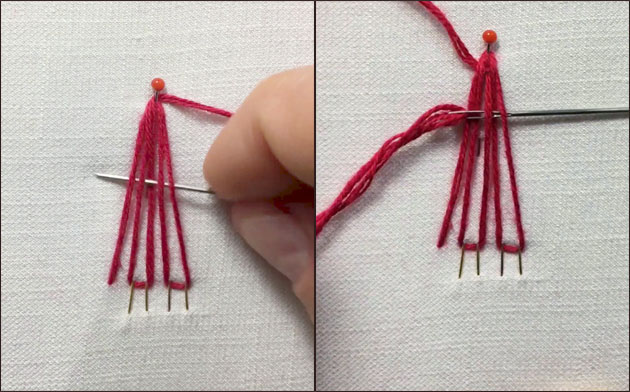
One final time, I pass the thread behind the head of the pin, and now, my 5 warp threads are ready. From here on, it's the standard picot weaving process. It gets simpler from this point onward! I continue weaving back and forth until I reach the base of my picot.


*In my own weavings, I've devised a method for the first two rows of the picot that I believe creates a neater end. 
When doing this, in the first row, I pass my needle only over the middle warp thread and under the others. In the second row, as I progress from left to right, I pass the needle over the 1st and 2nd warp threads and under the 3rd and 5th warp threads.
Today, I'm here to introduce a new idea that will add depth to your 3D embroidery work.  I'll be demonstrating how to create three-dimensional rosebuds using the Standalone Woven Picot and Chain Woven Picot Stitch techniques.

For the subsequent rows, I continue in the regular weaving pattern by passing the needle over one warp thread and under the other.
Today, I'm here to introduce a new idea that will add depth to your 3D embroidery work.  I'll be demonstrating how to create three-dimensional rosebuds using the Standalone Woven Picot and Chain Woven Picot Stitch techniques.
While weaving, as the needle passes between the warp threads, gently pushing the upper rows upwards with the needle creates a smoother weaving.

My weaving is complete, and now comes the fun part! I'm removing the safety pins from the fabric, snipping and discarding the first knot. Then, I grab the end of the picot and pull it, and my woven petal separates from the fabric.
Today, I'm here to introduce a new idea that will add depth to your 3D embroidery work.  I'll be demonstrating how to create three-dimensional rosebuds using the Standalone Woven Picot and Chain Woven Picot Stitch techniques.

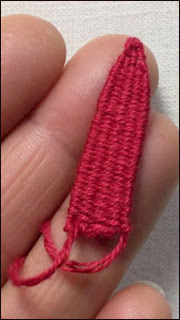
Here's my 'standalone' or 'free-standing' woven picot stitch petal.
Today, I'm here to introduce a new idea that will add depth to your 3D embroidery work.  I'll be demonstrating how to create three-dimensional rosebuds using the Standalone Woven Picot and Chain Woven Picot Stitch techniques.

This picot petal will become the closed bud of my flower. To achieve this, I take the wider end of the picot as the center and roll it around itself to create a coil shape. When I reach the end of rolling the picot, I secure the tip of the picot near the base of the coil using a needle and thread. 
Today, I'm here to introduce a new idea that will add depth to your 3D embroidery work.  I'll be demonstrating how to create three-dimensional rosebuds using the Standalone Woven Picot and Chain Woven Picot Stitch techniques.
I secure the base of the coil by stitching it from the bottom to ensure it won't unravel. Additionally, I don't cut and discard the leftover threads from the weaving; I leave them as they are.
For now, I'll set this aside and move on to the sepal part of the flower.


In my previous works, I've used the chain woven picot stitch technique primarily to create flowers. Now, when I create my picot chain consisting of 5 petals, we'll see it serving a different function.

This time, to attach my 5-chain picot to the fabric, I'll use tacking stitches instead of safety pins. I'm making 10 straight stitches in a vertical position, spaced about 2-3 mm apart on the fabric. 
The length of the stitches should be around 4-5 mm.

Today, I'm here to introduce a new idea that will add depth to your 3D embroidery work.  I'll be demonstrating how to create three-dimensional rosebuds using the Standalone Woven Picot and Chain Woven Picot Stitch techniques.
To start, I thread my needle with green-colored thread and tie a secure knot at the end.
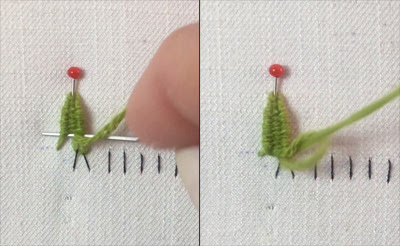
I'm beginning in the same way as before. You can see how I've arranged the warp threads in the image above.
Today, I'm here to introduce a new idea that will add depth to your 3D embroidery work.  I'll be demonstrating how to create three-dimensional rosebuds using the Standalone Woven Picot and Chain Woven Picot Stitch techniques.

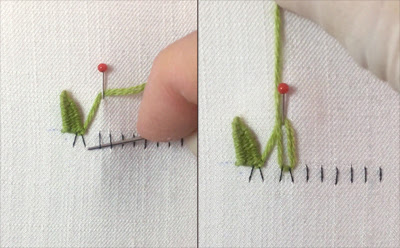
When the weaving is complete, I wrap the thread once around the bottom of the 3rd leg of the picot and pass my needle through it to create a knot.
Today, I'm here to introduce a new idea that will add depth to your 3D embroidery work.  I'll be demonstrating how to create three-dimensional rosebuds using the Standalone Woven Picot and Chain Woven Picot Stitch techniques.
This step provides a secure hold, allowing me to continue without having to secure the first warp thread of the second picot with a stitch.
Today, I'm here to introduce a new idea that will add depth to your 3D embroidery work.  I'll be demonstrating how to create three-dimensional rosebuds using the Standalone Woven Picot and Chain Woven Picot Stitch techniques.
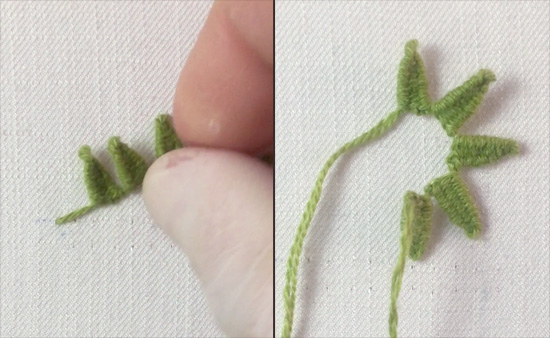
In the second picot, I continue shaping the warp threads and weave onwards. To sum it up, after finishing each picot, I tie a knot at the base of the 3rd leg and proceed to the next picot.
 I repeat this process until I've completed five picots
Today, I'm here to introduce a new idea that will add depth to your 3D embroidery work.  I'll be demonstrating how to create three-dimensional rosebuds using the Standalone Woven Picot and Chain Woven Picot Stitch techniques.

When I finish weaving the picot chain, I remove everything that attaches it to the fabric. 
Today, I'm here to introduce a new idea that will add depth to your 3D embroidery work.  I'll be demonstrating how to create three-dimensional rosebuds using the Standalone Woven Picot and Chain Woven Picot Stitch techniques.
I remove the picot's pin, undo the tacking stitches, cut the knot I tied at the beginning, and then gently pull the picot's end to detach it from the fabric.

After finishing the picot chain, there are two thread tails left at each end: one from the initial starting point and the other from the thread remaining after weaving.
Today, I'm here to introduce a new idea that will add depth to your 3D embroidery work.  I'll be demonstrating how to create three-dimensional rosebuds using the Standalone Woven Picot and Chain Woven Picot Stitch techniques.
 I take one of the dangling leftover threads from the picot chain. 
I thread the free end of this thread onto my blunt-tipped needle and gather the loops at the base of the picot chain onto my needle, passing the needle through them and pulling my thread. 
Now, the picot chain takes on a circular shape.

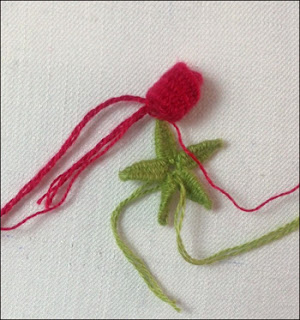
Alright, my two woven pieces are ready to be joined together, as you can see in the image below. Let me explain how I go about connecting them.
Today, I'm here to introduce a new idea that will add depth to your 3D embroidery work.  I'll be demonstrating how to create three-dimensional rosebuds using the Standalone Woven Picot and Chain Woven Picot Stitch techniques.

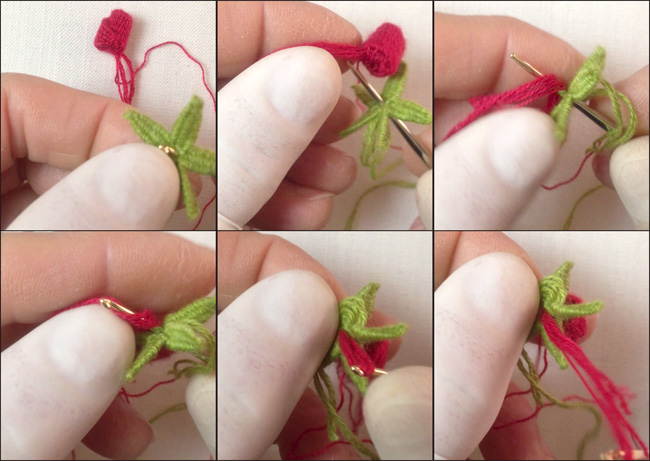
I take the threads that hang from the end of the coiled picot in my hand. My picot chain is now in a flower shape with a hole in the center.
 Using a crochet hook, I pass the hanging threads from under the coil through the hole in the center of the sepal and pull them through. I position the sepal against the base of the coil.
Today, I'm here to introduce a new idea that will add depth to your 3D embroidery work.  I'll be demonstrating how to create three-dimensional rosebuds using the Standalone Woven Picot and Chain Woven Picot Stitch techniques.
Now, it's time to securely join these two pieces together. First, I anchor the sepal and picot spiral with concealed stitches. 
Today, I'm here to introduce a new idea that will add depth to your 3D embroidery work.  I'll be demonstrating how to create three-dimensional rosebuds using the Standalone Woven Picot and Chain Woven Picot Stitch techniques.
 Then, I wrap my green thread around the red thread that extends from the bottom of the sepal, right below the sepal.
As I do this, I create a rounded shape, much like the bulbous lower part of a flower bud.
Today, I'm here to introduce a new idea that will add depth to your 3D embroidery work.  I'll be demonstrating how to create three-dimensional rosebuds using the Standalone Woven Picot and Chain Woven Picot Stitch techniques.

I wrap the green thread around the red thread, creating a stem that's about 1.5 to 2 cm long. After finishing this, I secure the thread with stitches.
In the picture above, you can see the completed rosebud. The picot chain has served as the sepal beautifully, hasn't it? 
Now, I trim and discard the excess threads hanging from the tip of the rosebud.
Today, I'm here to introduce a new idea that will add depth to your 3D embroidery work.  I'll be demonstrating how to create three-dimensional rosebuds using the Standalone Woven Picot and Chain Woven Picot Stitch techniques.
Now, I can go ahead and stitch the rosebud into its designated place in the embroidery design. 

That's it! 
Today, I'm here to introduce a new idea that will add depth to your 3D embroidery work.  I'll be demonstrating how to create three-dimensional rosebuds using the Standalone Woven Picot and Chain Woven Picot Stitch techniques.
I'm sure you'll creatively incorporate the rosebuds you create using this technique into your own embroidery compositions.
Today, I'm here to introduce a new idea that will add depth to your 3D embroidery work.  I'll be demonstrating how to create three-dimensional rosebuds using the Standalone Woven Picot and Chain Woven Picot Stitch techniques.
If you liked this rosebud, you might also want to check out some different styles of rosebuds I've worked on in my YouTube videos, along with their tutorials. 

Here are the links that will take you directly to those sections if you click on them.


Quotes-Inspired Hoop Art Ideas with Felt Appliques, Embroidery, and Crocheted Flowers

Explore 3D embroidery flower garden designs.

Bring your dream garden to life in your embroidery projects with simple and easy embroidery patterns!


➠➠➠➠➠➠➠➠➠➠➠➠➠➠➠➠➠➠➠➠➠➠➠