♥ Unleash Your Creativity: Master a New Technique in Embroidery - 3D Embroidered Leaves: A Step-by-Step Tutorial
Today, I'm excited to share with you an easy method for embroidering leaves.
My approach to the woven picot stitch is slightly different from traditional techniques, as it creates a herringbone-like three-dimensional effect.
While I can't claim sole ownership of this method, I believe it offers a unique twist to this stitching style.
Are you ready to learn how to embroider leaves using this technique?
Let's dive in!
To begin, cut a suitable length of thread for your project and thread a needle on each end.
To keep the embroidery hoop steady and flat while working with two needles, it's advisable to place it in a hoop stand or a similar device. This will ensure that your hands are free to handle the needles with ease.
On the fabric, create a horizontal stitch that will act as the base of the leaf, positioning it where you want the leaf to start. Pass both needles to the backside of the fabric, ensuring that the stitch is centered between the two needles. Make sure there is an equal amount of thread on both needles. Next, bring both needles to the front side of the fabric, keeping them approximately 2-3 mm away from each side of the wide stitch in the center.
Grab a straight pin and use it to catch the center stitch.
As both ends of the thread are not anchored, gently pull the pin upward, causing the wide thread to form a loop that takes the shape of an inverted V. Determine the desired length for your leaf and extend the looped thread accordingly.
Secure the loop to the fabric by pinning it in place.
You now have a pin-backed loop that beautifully resembles a leaf.
Take the two threads with needles on each end and pass each one around the head of the pin that holds the loop.
This will cause the threads to cross over each other. The thread on the right side will move to the left side, and the thread on the left side will move to the right side.
Gently pull the threads to tighten them and adjust the tension to a suitable level for weaving.
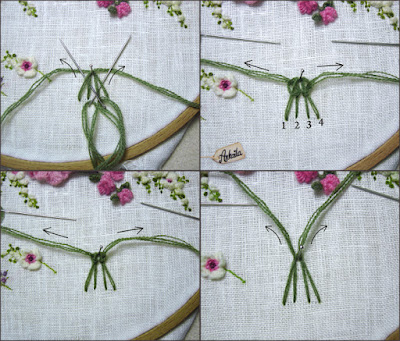
Step2.
Now, let's start weaving. Take the needle on the left side and pass it under the threads numbered 1 and 2, then bring it over its own thread, forming a loop. Gently tighten the loop.
Repeat the same steps on the right side, taking the needle under the threads numbered 3 and 4, and bring it over its own thread, tightening the loop.
Step3.
Repeat step 2 once more.
Step4.
In this step, bring the left needle from the outer side to the inner side, passing it under threads 1 and 2, and exit from the center. Repeat the same on the right side with the right needle, passing it under threads 4 and 3, and exiting from the center. Gently pull the threads. Now, the right needle has moved to the left and the left needle has moved to the right.
Step5.
In this step, take the left needle and move it outward from the center, passing only under thread 1 and skipping thread 2. Repeat the same process on the right side in a symmetrical manner. Take the right needle and pass it under thread 4. Gently pull both threads outward to tighten the loops.
Step6.
In this step, repeat the fourth step once again.
Grab the left needle and insert it from the outside towards the inside, passing beneath threads 1 and 2. Likewise, repeat the same process with the right needle, passing it beneath threads 3 and 4, emerging from the center. Pull both threads gently from the sides as depicted in the illustration. To achieve a neat texture, use a thick needle to push the weaving threads upward and tighten them.
Continue repeating steps 5 and 6 in a continuous manner until you reach the bottom of the design.
As you near the center, be careful not to pull the weaving too tightly, allowing the leaf to maintain its natural shape. Once you reach the bottom, insert the needle back into the fabric to secure the picot stitch. Remove the pin, and you're done!
Here are a few pictures that demonstrate the appearance of the woven picot leaf when it is lifted off the fabric. These images showcase the intricate weaving technique and the three-dimensional texture of the leaf.
If you carefully follow each step I've shared on how to stitch this cute leaf, you will be able to achieve similar results. Remember to take your time, be patient, and follow the instructions closely.Happy stitching!
If you're interested in seeing how I've incorporated this 3D leaf into my embroidery design, I invite you to check out the tutorial through this link
It provides a detailed walkthrough with clear instructions and helpful visuals. I hope it gives you ideas and inspiration for incorporating this technique into your own projects. Enjoy exploring and happy stitching!


