If you're new to 3D embroidery, you may want to start with something a bit simpler.
Today, I'll show you how to make the cast-on stitch. Once you know the basic steps, you'll be creating your own roses in no time.
To begin, stretch the fabric into a hoop by securing it tightly. This will allow you to have both hands free to work. Thread your needle and tie a small knot at the end of the thread. The cast-on stitch is made similarly to a bullion stitch. Start the stitch in the same way as you would for a bullion stitch.
Bring the needle and thread from the back of the fabric to the front at point 1, as shown in the image
Insert the needle into the fabric about half a centimeter away from the exit point of the thread on top of the fabric.
Pass it underneath the fabric for a short distance, which determines the width of the knot and the petal. Bring the needle up again at point 1 towards the front of the fabric
To summarize, create a stitch that resembles a larger backstitch by passing the needle through the fabric between points 2 and 1, with both ends of the thread on top of the fabric.
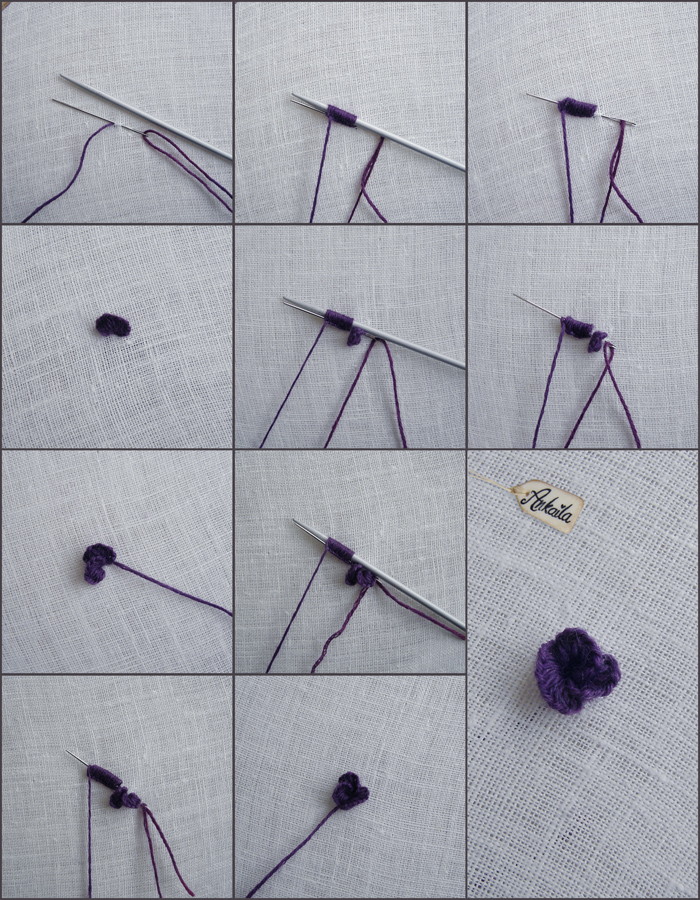
Alright, let's get started with creating the cast-on stitch! Here's how you do it:
Create a loop with the thread.
Insert the needle through the loop, just like in the picture.
Gently push the loops towards the end of the needle, creating space for more loops and keeping everything aligned.
Continue adding loops to the needle until you have the appropriate number of loops for your petal.
Grasp the loops tightly between your thumb and index finger. Slowly pull the needle through the fabric and loops while maintaining a firm grip.
Continue pulling until the thread and loops are snug.
Use your fingers to adjust and shape the knot as needed. Finally, bring the needle to the back of the fabric at point 2 to complete the petal.
That's all! Your petal is now complete and ready to join the beautiful array of embroidered flowers
To create larger petals with the cast-on stitch, you will need to make wider loops.
When the loops are placed onto the needle, they form a series of loops that are as wide as the needle itself.
To achieve wider loops, you'll need something to provide support and increase the thickness of the needle. If you do crochet or knitting, you may have a metal crochet hook or knitting needle that can serve this purpose.
Simply place the additional knitting needle or crochet hook alongside the working needle.
Here's what you can do:
Place the loops onto both needles, with the additional knitting needle or crochet hook positioned next to the working needle.
Once you have completed the series of loops, but before pulling the thread, carefully remove the additional tool.
This technique allows you to create wider loops, and removing the tool becomes easier due to their smooth sliding."
You can observe how the size of the petals increases as the thickness of the supporting needle changes in the cast-on stitch.
Of course, as the loops become larger, it is important to note that we need to make the initial back stitch wider and add more loops onto the needles.
I created smaller-sized petals at the center of the rose, and as we progressed outward, the size of the petals increased.
Now, let's create a single rose to put your newly learned techniques into practice. We will start from the center and create petals that wrap around each other in a circular formation.
You can follow the step-by-step process with the accompanying photo guide, which illustrates each step along the way.
We'll start with a small cast-on stitch.
The second sepal will begin from the center of the first sepal, with both petals wrapping around each other halfway from the outside.
The third petal will also wrap around the second petal halfway from the outside, forming a circular shape. Refer to the illustrated diagram below for a visual representation of the process.
In the first two rows, I made three petals each. For the final row, I made five petals consisting of five wide cast-on stitches each.
The accompanying images below illustrate the different stages of the process. In this lesson, I used three different colors.
I hope I have effectively explained the process of the cast-on stitch technique.
As you embark on creating your own beautiful flowers, I would be thrilled to serve as a source of inspiration for you.

.jpg)
.jpg)
.jpg)
.jpg)
.jpg)
.jpg)


